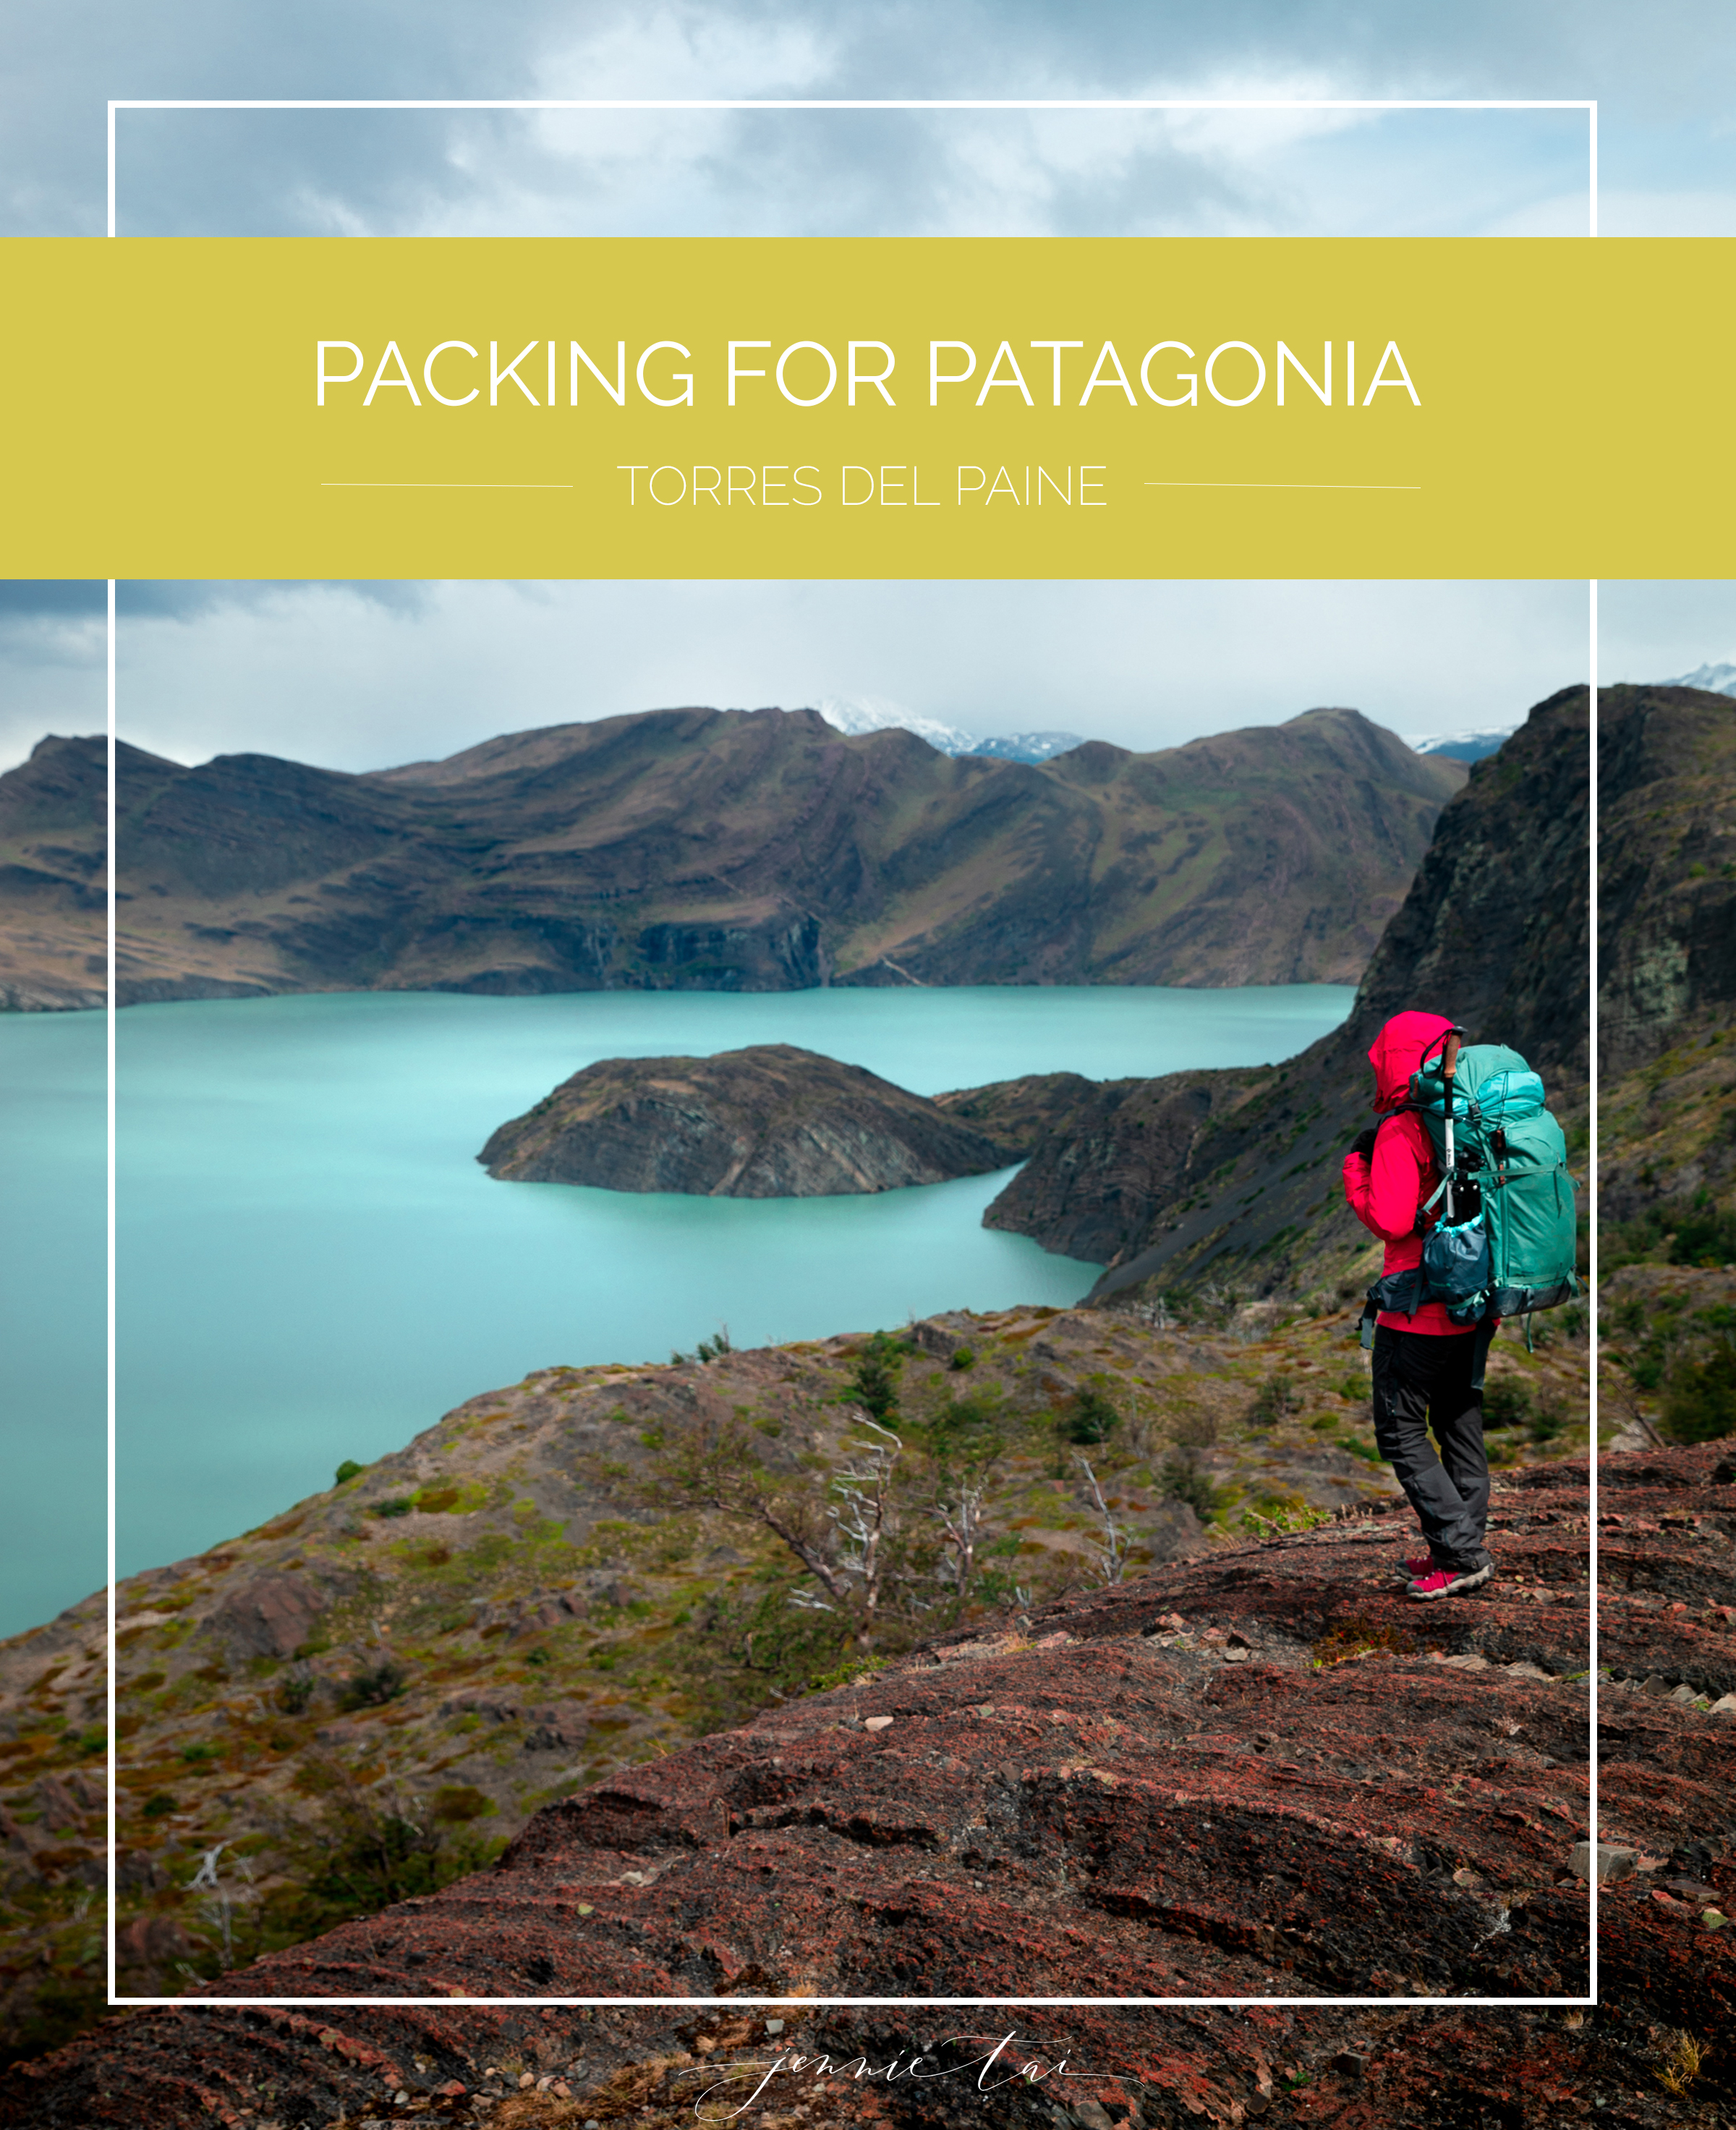
[ Lake Nordenskjold, Torres del Paine: Patagonia Chile ]
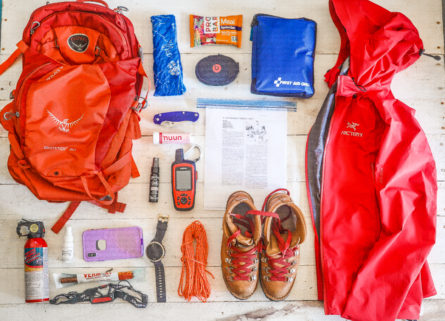
I was practically doing snow angels in all the gear I dumped into the middle of my room when I tried packing for my 6 day trek in Patagonia a few months ago. Finding the balance between packing what I need, and keeping it under a weight I’m willing to carry is something I constantly struggle with when I backpack, so I decided to put together a list to help out anyone in the same boat.
In this list, you’ll see what I packed, what I wish I didn’t, and what I’d bring next time if I could do it again. If you’re visiting Patagonia this season, I hope this helps! The good news is that you probably don’t need as much as you think you do. For one, you won’t need to bring any water filter/treatment because all of the water sources are straight from glaciers and ready to drink. Secondly, there aren’t any snakes, bears, or poisonous plants to protect yourself from. Third, the hostels and camping centers are packed with food, water, camping gear, other essentials… a lot of booze 😉 …. and lastly (one of my favorite things about this place) there are virtually zero bugs, so you won’t need to spray yourself down with deet and citronella at any point, because you don’t have to worry about hiking in any clouds of gnats or mosquitoes.
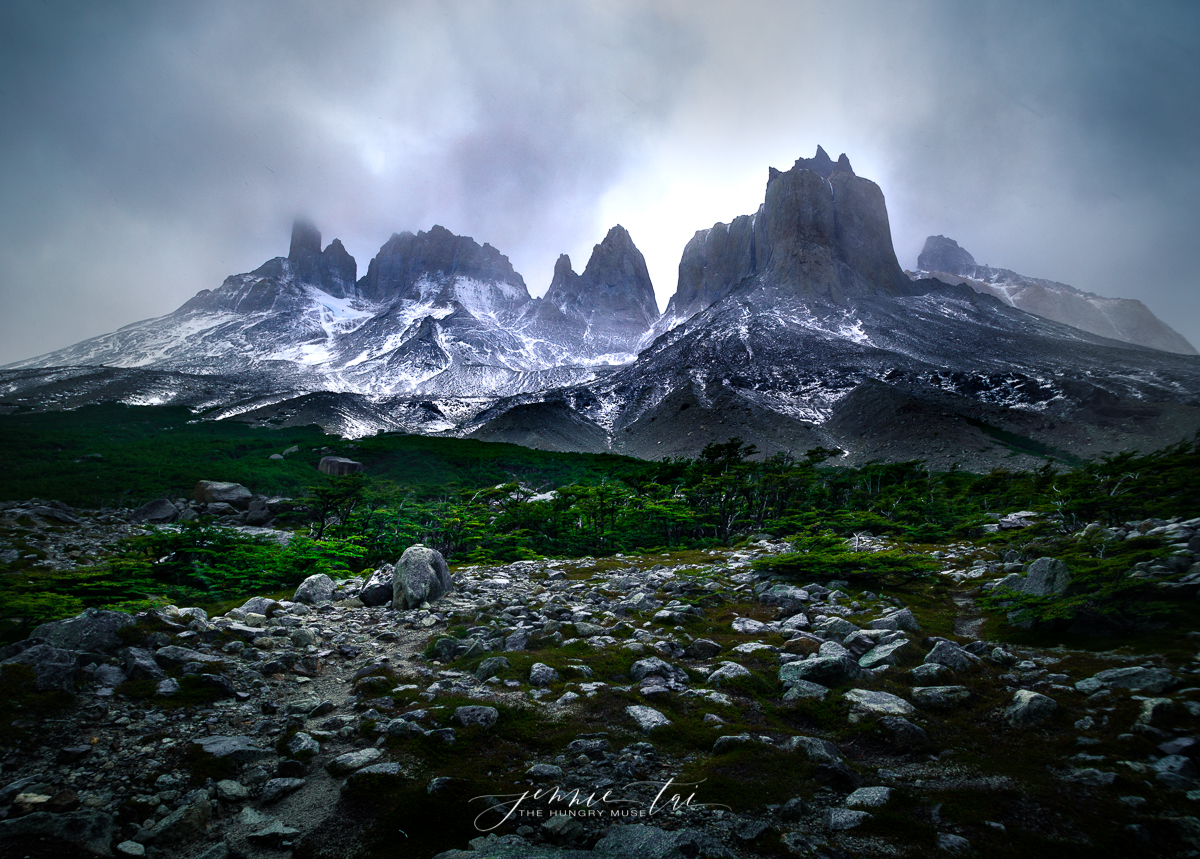
[ Britanico Mirador, Torres del Paine: Patagonia Chile ]
About the hike…
I packed for 6 days and 6 nights to hostel-hop my way through the ~60mi “W” trail in Torres Del Paine, Patagonia (which I’ll write more about later) and visited during the Summer when the weather varied between 40-60 degrees F in rainy, windy and snowy conditions.
This list assumes that you’re relying on Patagonian hostels for food and shelter, so it won’t include any meals, snacks, cooking equipment, tents or sleeping pads (which are all provided by the hostels).
What I brought…
I carried about ~35lb with all my camera gear, but would have carried a little under ~30lb without it.


 Shimoda Explore 60 Starter Kit
 Osprey Packs Aura Ag 50 Women's Backpacking Pack
 Osprey Packs Atmos Ag 50 Backpacking Packing Pack
 Osprey Packs Stratos 36 Backpack
 Salomon Agile Bag 12 Set
BACKPACKS
- Overnight (main) pack
I brought my 60L Shimoda Camera System, but you don’t need this big of a bag if you aren’t hauling around a ton of camera equipment, and can bring a 40-50L, like the Women’s Osprey Aura 50L (which is currently $40 off) or the Men’s Osprey Atmos 50L (also on sale). One guy in my group even brought as little as this 36L Osprey. - Ultralight daypack
On days where you don’t need to hike to a new a hostel, you won’t need to carry your giant overnight pack with you and can take a much lighter daypack like this super light Salomon 12L Daypack to carry your essentials (water, snacks, gloves, etc) on your hike. I like the Salomon 12L because it’s thin enough to stuff in one of my overnight pack’s pockets. I made the mistake of trying to get away with bringing my old Osprey 36L at first, which took up way too much room and was 2x the weight. - Backpack Rain Cover
Every backpack brand has their own version of a raincover, but I like this one because it hugs the top section of your bag, which is helpful when it gets really windy in Patagonia and your backpack cover becomes a giant sail. It randomly rains and gets super windy in Torres del Paine, so a pack cover is crucial; especially if you’re a photographer hauling around thousands of dollars of equipment. On our first night in TDP, we shared a room with a girl who told us how bad the rain got that day, and how it seaped through her cover, her backpack and everything inside.


CLOTHES
- Hardshell jacket
Your hardshell is going to be your top layer, and should be a little larger than the others so you can wear a fleece, midlayer and a baselayer underneath without it being too tight. I love my goretex Arcteryx Beta SL jacket, because it keeps me dry, is super light and thin enough to ball up and stuff in my backpack, but also keeps me really warm. I’ve also heard good things about the Patagonia Houdini or the Outdoor Research’s Helium II (currently on sale) which is also super light and does the job of keeping you dry when it rains. - Midlayer jacket
Also known as a “puffy” 🙂 this is a lightweight (normally down-based) layer that is meant to provide you a second layer of warmth underneath your hardshell. I wore an older, yellow version of the Arc’teryx Cerium SL Hooded Down Jacket, but something like this Patagonia Down Hoodie in Grey will do the job. - Fleece sweater
This is another layer that goes under your mid layer, or replaces it under your hardshell to keep you warm. A lot of us didn’t actually bring this layer (including myself), but we all ended up buying it when we arrived in the city and realized how cold it got at night and when it rained. I bought myself a zip up from a random shop the night before we headed into the park, but if I could do it over I would have brought something like the Arc’teryx Covert Fleece Hoodie. - Two pairs of trekking tights
I brought two pairs of my favorite hiking tights, the Prana Rockland Leggings, which have the feminine feel of yoga pants, but don’t snag on trees or slide on rocky surfaces like a good pair of hiking pants should do (like the Prana Halle Hiking Pants, which I used to wear on shorter hikes). - Rain pants
Your rain pants are meant to be a layer you can slip on quickly over your tights when the weather changes, you want something that’s light and large enough to go over your baselayer, like the Arc’teryx Beta SL pants, which I would have brought instead if I could do it over again. I brought my favorite waterproof Fjallraven Keb’s (which I normally wear by itself), but they felt a little snug with my tights underneath. - Lounging pants
This is meant to be something you can slip into after you shower at the end of your hike (if you plan to…) and to sleep in. I wore Kari Traa Baselayers, which are thin, light, warm and come in cute matching sets. 🙂 - Two quick-dry long sleeve tops
I wore some old white Athleta half-zips I can’t find online anymore, but it looked something like this grey Underarmour Hotshot Half Zip. - Three sports bras
Two to hike in, one to sleep in. I live in my black Prana Momento‘s because they’re light, super soft (stretch jersey), provide good support… and the back design is really pretty 😉 - Three pairs of hiking socks
Smartwool and Darn Tough socks (which I own the most of) have wool + nylon blend socks that are good with regulating your foot temperature as you hike long distances. - Beanie
I wore my black Prana Pammy under my hardshell’s hood to keep my ears and head warm when it snowed. - Hat
To shield your eyes from the sun, like this one (currently on sale). - Buff
To shield your face from the wind and rain. The one I bought is on sale here. - Waterproof gloves
To keep your hands warm and dry in the rain and snow. I wore the Arc’teryx Venta‘s but there Smartwool 150 Merino’s and Underarmour Survivors are similar and a little cheaper. Both are touchscreen compatible 😉


SHOES
- Hiking Boots
Shoutout to Oboz for making such a perfect pair of hiking boots that I didn’t even need to break them in when I brought my Oboz Bridgers out for first time on this trip, and I didn’t get a single blister. I also love them because they come in Wide sizes (for my duck feet!), and are mid rise, which kept me dry as I jumped through puddles and walked through creeks like a boss. - Ultralight Slippers
If you plan to shower–whether you’re camping or hostel-hopping–bring a pair of flip flops or crocs to wear in the bathroom, or just to change into for the night when you’re done hiking for the day. I’ve seen girls recommend crocs, but I feel like they’d take up a lot of space in my backpack, so I just brought my old Old Navy flip flops, which I just slip into the laptop-sleeve of my overnight pack.


GEAR
- Trekking poles
Half my group brought trekking poles, and the other half didn’t. I used to bring mine everywhere, but I felt like they got in the way when the trail got steep, and I ended up using only one on my last two days in the park. I love my Black Diamond Alpine Poles because I can take them apart to fit them into my carry on bag, are easy to adjust, and the cork grip keeps my palms dry–but I ended up only using one pole at a time on most of the treks. - Sleeping bag
Don’t laugh! I brought a 15 degree Nemo with me (which is 15+ degrees below the lowest temperature the park will reach at night) but I have zero regrets! I sleep really cold, so it was the perfect temperature for me. I love my 15 degree Nemo, because it’s super warm, THIN, has a pillow pocket (which I stuff my puffy jacket into), and zippable vents. While every hostel has a mattress, pillow and blanket for you to sleep in–my cousin and I brought our sleeping bags because we felt more comfortable sleeping in our own gear. - Headlamp
You can bring one in case you get caught in the dark, or need to get up at night. I used my Petzl Actik Core,which has 3 brightness settings I like to use so I don’t get yelled at again for blinding people when I head out for sunrise hikes 5AM. The hostels on the W are well lit, but I used my headlamp when I went out before sunrise or after sunset to take photos, and also when I needed to pack in my room but didn’t want to turn the light on while everyone was still sleeping. - Knife
I bring a camping knife with my everywhere in case I need to cut rope or packages of food open. To be honest I didn’t use it at all on this hike. I have an old camping knife I can’t find online anymore, but I like the Swiss Army Knife that a friend brought on this trip, which can do way more than mine does.


SNACKS & HYDRATION
- Bladder / Water Reservoir
Most people in my group carried a nalgene/water bottle with a wide mouth so they could quickly refill it in creeks, but I brought my bladder because I’m lazy and like to take sips of water to hydrate while I’m hiking (vs reaching around to pull bottles out of my bag). - Hydration tabs
I take hydration tabs with me whenever I hike (or travel in general), because it does a better job of keeping me hydrated than drinking plain water and tastes much better. Traveling all day and sitting in airplanes/buses for multiple days can leave you pretty exhausted and dehydrated, so I always bring hydration powder (like these Liquid IV packs) or tablets (like Nuun, on sale now) to get ahead of being dehydrated on and off the trail.


PERSONAL ITEMS
- Lock
All of the hostels on the W trail in Torres del Paine have lockers you can use to keep your backpack at night. They don’t come with locks, so having one is helpful if you don’t want to bring your passport or have a ton of expensive equipment you don’t want to bring everywhere with you. I used this TSA travel lock because it’s small, has a thin and flexible latch and is super light. - Body wipes
I didn’t know that all of the hostels on the W trail in Torres del Paine have hot showers, so I brought little packets of Body Swag Body Wipes. - Shampoo & body wash
If you plan to shower, then this is where all of those mini hotel shampoo and bodywash bottles come in handy 🙂 if you aren’t a horder like I am, then just squeeze some of your favorite shampoo or bodywash into these tiny, leak-proof squeeze tubes. - Deodorant
I love these tiny little palm-sized Secret Freshies because they’re tiny, but strong and don’t take up much space in my toiletry bag. - Toothbrush & toothpaste
This tiny set also comes with mouthwash. - Sunscreen
I wear EltaMD’s tinted facial sunscreen every day whether I’m hiking or not, but this tube takes up a little less space than the typical can it comes in. - Facial wipes & lotion
Skincare is a religion in my family, so I know this may sound ridiculous. However, my mom would kill me if I went a week without taking care of my face, so I brought a small pack of facial wipes, a tiny power peel pack in case of an emergency, and my night cream: Dermalogica Skin Smoothing Cream. - Blister bans
IMO, one obnoxious blister can ruin your entire hike, so I brought these just in case. - Towel
Out of the whole group, I probably brought the largest and heaviest towel (my quick dry microfiber Nomadix Camping Towel), but I wasn’t sure how the showers were arranged, and wanted to be able to cover up my whole body and dry off quickly to stay warm so I brought the whole thing and didn’t cut it. It packs down really small, and I kept it in my laptop sleeve so I have no regrets. - Power bank
I take a lot of photos and videos throughout my hikes with my phone, so I brought a mini rechargeable power bank with me to last me throughout my hikes. - Travel power adapter
You can charge your gear in the hostel hallways (and there is always one somewhere in every hostel on the W), but you’ll need a converter, or at least a usb cord to use the community power bank. I have a big universal adapter that I bought because I needed to use it in Europe and on this trip, but all you really need is a simple South American converter like the little one in this kit if you want to save a little space in your backpack. - Mini first aid kit
If you’re hiking with a guide, they’ll most likely have a first aid kit with them and won’t need this. I was paranoid about getting lost, so I brought a little one just in case.
EVERYTHING ELSE
- Plastic ziplock bags
If you’re like me, and horde all the complimentary ziplock bags from all your online orders like a squirrel–THIS IS YOUR TIME TO USE THEM! 😉 I organized all my things into ziplock bags to keep everything dry from the rain, and used empty ones to separate my clean and dirty clothes. I also used one to wash my laundry while I showered.


CAMERA EQUIPMENT
- DSLR Camera Body
I shoot with a Canon 5D Mark IV, and brought this giant brick of a camera only because I didn’t get my new Canon EOS R in time, which is also a full frame DLSR but is MUCH smaller and lighter. Mirrorless camera systems are almost always smaller and lighter than standard DSLR systems, so if you have the budget to invest in them–bring a mirrorless system to reduce the space and weight to carry on a long trek like the W. - Wide angle lens
I love shooting with my Tamron 10-24 f3.5 (currently on sale for $200 off) when I want to get a lot in one shot. I used this the most when I was out in Banff, and expected to use it a lot in Patagonia. - Zoom lens
The most versatile lens I own, my Canon 24-70 f.2.8 L lens was what I had out the most on this hike. The low aperature setting it has, and its ability to zoom as far as 70mm allowed me to create a lot of depth in some of the photos where I didn’t need a huge landscape in one shot (like just a waterfall, or a creek) - Prime portrait lens
I brought this lens, because the aperature goes down to 1.4 which is great for Focus Stacking, when you want to get one image that has multiple focal points and lots of depth. I also wanted to get a few shots of my cousin and her boyfriend on this hike, so I brought my Canon 35mm prime 1.4 L lens , which I used to use a lot when I did a lot of food and portrait photography. - Tripod
Nobody wants to see a blurry landscape photo with fuzzy trees and soft mountain peaks, and I don’t trust myself to take a photo at anything faster than 1/250 seconds, so I always bring my Benro carbon fiber slim tripod with me. - Wireless shutter remote
I love this thing so much (just remember to find the one that’s compatible with your camera). I hike alone a lot, so I don’t always have someone nearby to take photos of me. Sometimes I can get away with using Canon’s remote wifi app on my phone, but it loses connection when my phone and I are too far away from my camera. This wireless shutter remote lets you tune to a channel to take photos from a long distance (like across a lake) and is really helpful if you don’t want to be the primary subject of your photo, and you don’t want to do a long timelapse or have enough time to run to your spot.
Find out more about my camera equipment.
What I wish I brought…
- Castille liquid soap
This not only would have replaced the two bottles of shampoo and bodywash I brought, but would also have allowed to me to do laundry with it while I showered. I ended up using almost all of my cousin’s bottle of Dr. Bronner’s Lavender Liquid Castille Soap (sorry Yenni! <3 ) when I accidentally left my shampoo in a different hostel, and she told me I could not only use her castille soap to wash my hair but also to wash my laundry while I showered. A few drops go a long way, so I ended up using one of my big ziplock bags to fill it with water and two drops of castille soap to wash my second hiking outfit. It’s so powerful that even after washing it a second time when I got home, my outfit still somehow smells a little bit like the lavender castille soap. - Sunglasses
I underestimated how badly being outside for 10 hrs each day would fry my face, and ended up squinting so much throughout the day that I developed some lines between my eyes that I constantly tried to hydrate every night with lotion.
What I could have left at home…
I used just about everything I brought (especially the clothes), but below are the things I either didn’t end up using at all, or could have kept at home.
- First aid kit
My guides had huge kits that included everything we needed. I’m also a pretty slow hiker, and it was impossible for the backside guide to lose sight of me (lol) so I never got lost or needed to use any survival gear. - Shampoo & Body wash
I could have saved some space and weight if I had just brought one small bottle of Liquid Castille Soap to wash my hair, body and laundry. Instead, I brought two bottles (one of which I lost) and ended up using almost all of my cousin’s castille soap :/ If I could do it over again, I would have just brought one small bottle of liquid castille soap.
I hope this helps!
I’d love to hear your thoughts in the comments below & let me know if you have any questions!
Thanks for reading!

![The Pendulum’s Peak: Hiking Mount Rundle [Part I of II]](https://jennietai.com/wp-content/uploads/2018/09/20180813-4Z3A2866-5-150x150.jpg)