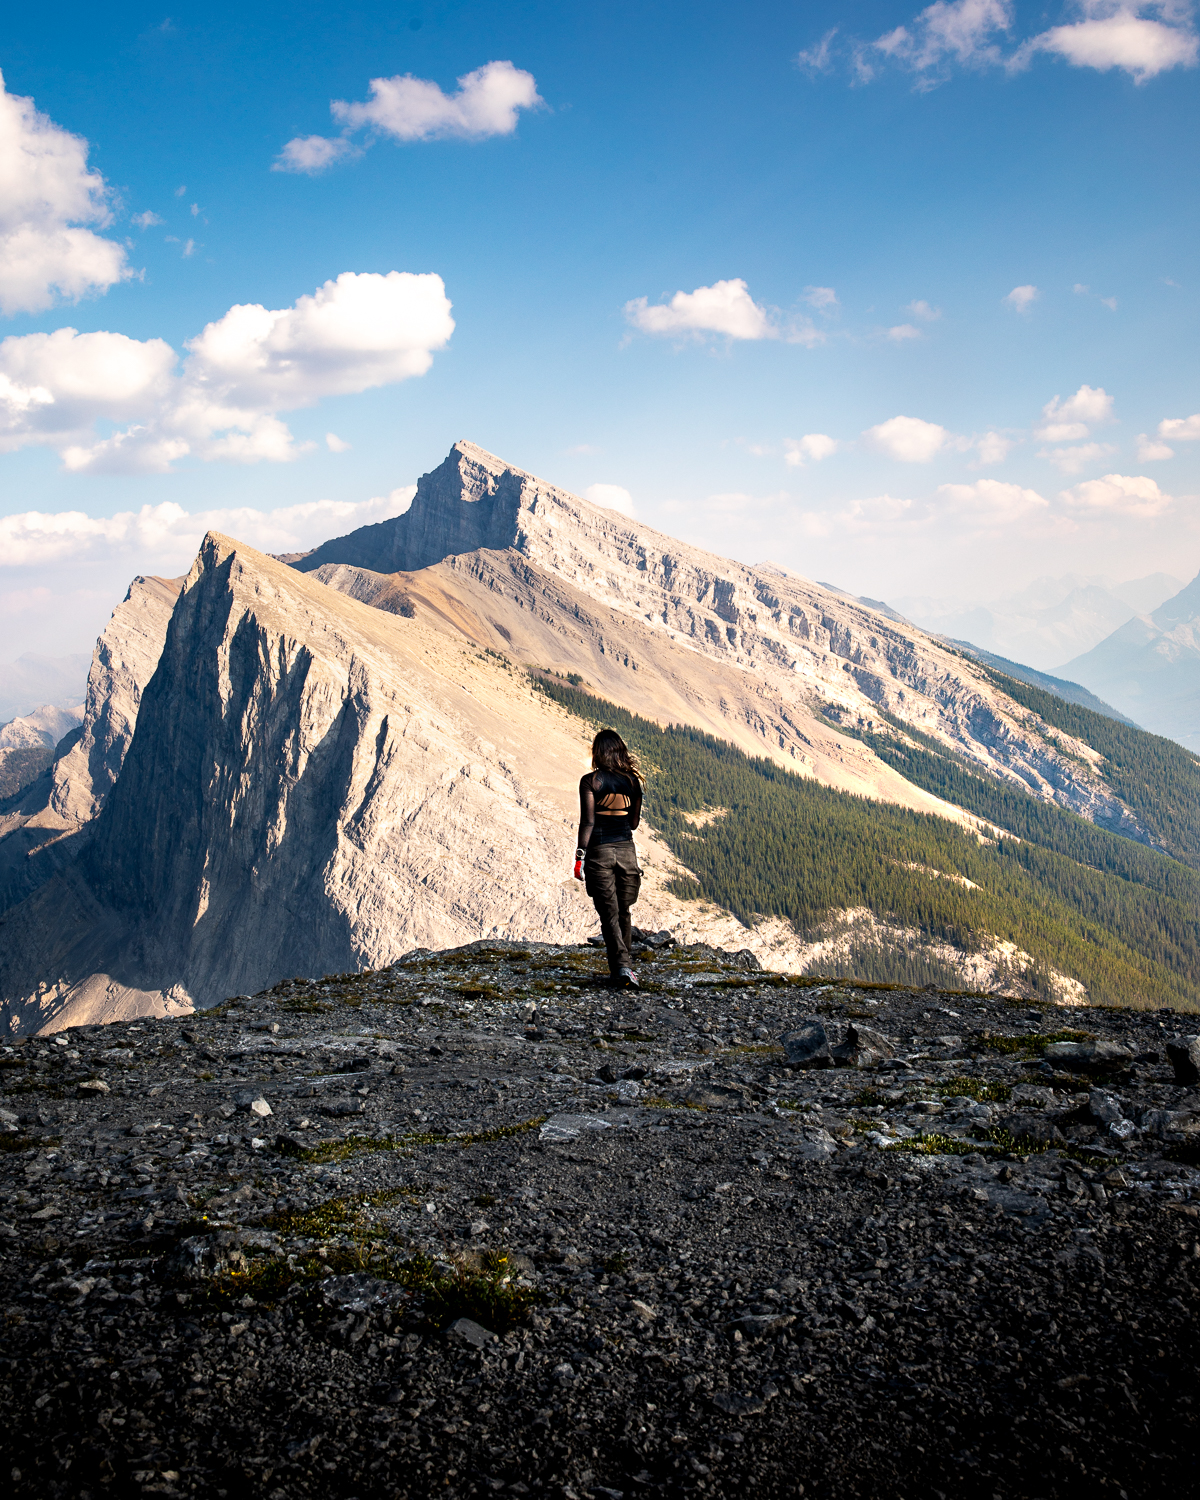
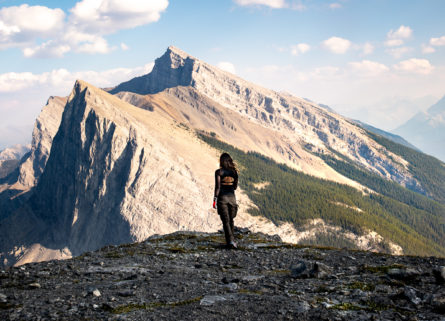
{ Hai Ling Peak from Mount Rundle | Full print }
When I decided to summit my first mountain last August, I had my heart set on a scramble in Canada’s oldest national park. One of five other mountains in Canmore’s corner of the Canadian Rockies, Mount Rundle stands almost ten thousand feet high in Banff National Park. Its’ wide, slanted peak can often be seen carving the pink and purple skies in the backdrop of Banff’s most iconic sunset viewpoint, Vermillion Lakes [Photo by Cath Simard].
On a high from the handful of knobs I’d scrambled in Virginia last Summer, I was a little delusional when I picked this mountain. I was so confident about owning this hike, that I spent more time researching bears and wolves than I did learning about the actual hike. Had I done the proper research about the trail before I set foot on this mountain, I would have realized that summiting Mount Rundle (or any mountain in Banff for that matter) would be a far cry from summiting any “hill” I’d ever climbed on the Appalachian Trail. More importantly – I would have realized that this was not the hike I should have chosen.
For perspective: the average height of any given mountain in the Canadian Rockies can often double the height of Virginia’s tallest mountain. Mount Rogers, the highest natural point in the Commonwealth of Virginia stands 5.7k feet above sea level, with a 2.5k elevation gain. Mount Rundle on the other hand, is almost twice as tall and stands at 9.7k feet above sea level, with an elevation gain that doubles Mount Rogers, and requires its hikers to climb a steep 5.3k feet within a tight four mile stretch to get to its summit. What I thought would be a challenging half-day “hike”, turned out to be an all-day climb that had me bouldering and bleeding from my fingernails and heels, climbing a mountain I was too stubborn to get off of.
This series organized into two parts: Part I (this post) is everything you need to know about doing this hike. It includes tips, guides, my pack list, my camera gear, what I wore, what I’d do differently and everything I wish I’d known before stepping foot on this mountain.
Part II, “The Pendulum’s Peak” (which goes live later this week) is a post about what I thought of this hike, how I struggled to turn around when I realized what I’d gotten myself into, and where my mind went when I couldn’t give up. At the very bottom of this post is an excerpt of Part II, the moment I mentally broke down on this hike.
That said – below is all you need to know about this hike if you plan to do it. Enjoy 🙂
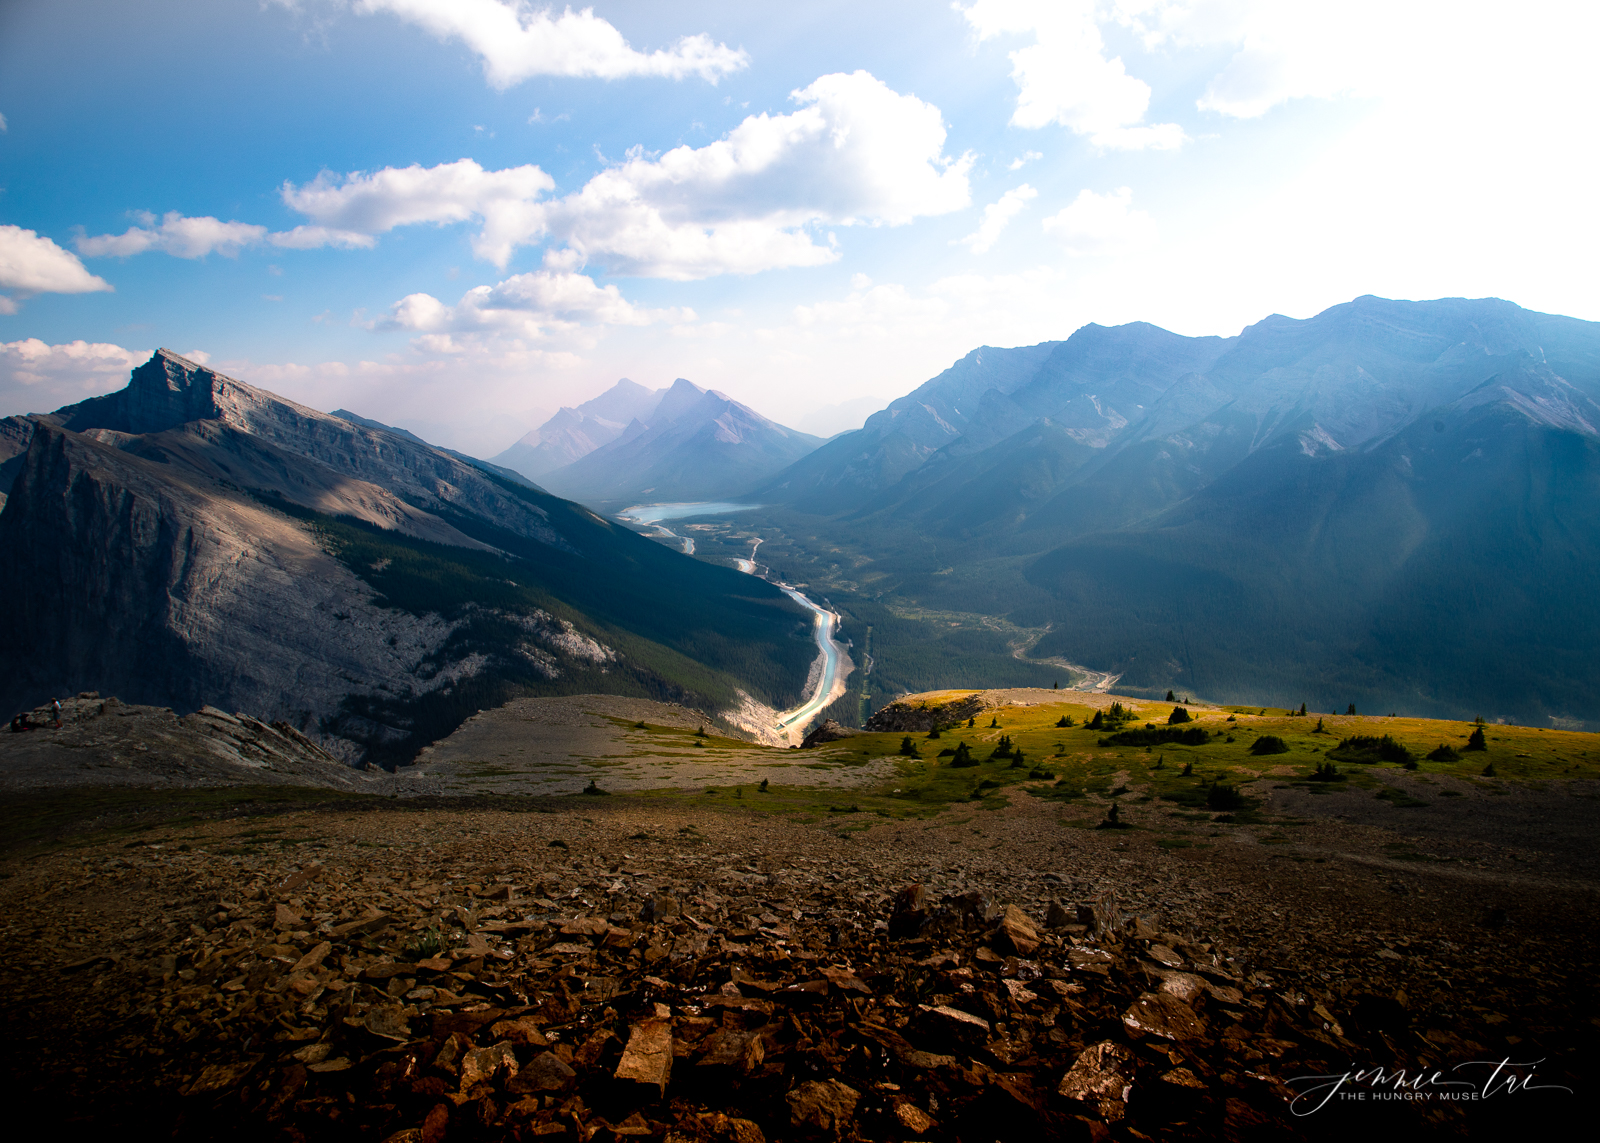
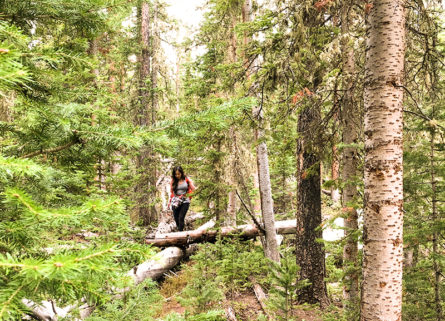
{ Bow River from Mount Rundle | Full print }
All you need to know
Trail information
Summary
Name: Mount Rundle
Location: Kananaskis County, Alberta CA
Total Mileage: 8.3 miles
Total height: 9,765 feet
Elevation gain: 5,314 feet
Average round trip time: 7-9 hours
Type: Scrambling (majority), bouldering, climbing, steep hiking
Trail: Moderately trafficked, but poorly marked!
Level of danger: Moderate (due to the exposure, the steepness and the poorly marked trail)
Difficulty: Moderate-Difficult (for experienced hikers); Strenuous (beginner-intermediate hikers)
Season: June through September
Permits: Not required
Trail map: GPX map via Alltrails
Everything else I wish I had read beforehand: [PDF]
Other references
Banff’s complete guide to this (and other) hike(s): [Link]
Detailed photo diary of hiking Mount Rundle: Hiking with Barry
Other scrambles to consider: Scrambles in the Canadian Rockies, Alan Kane, $27
When I was deciding on other scrambles I wanted to do, I bought this book upon recommendations to read about the ones I wanted to do the most.
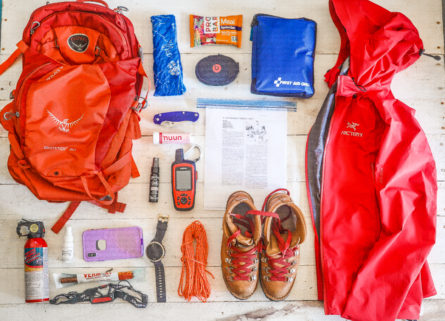
What I packed
A complete list of what I normally pack for short solo hikes can be found here. Below is a combination of what I pack for longer solo day hikes, and what I pack when I expect to take a lot of photos.
The Basics
- 60L Camera Backpack, Shimoda $320
This camera bag ripped after I swung it around a few times on this hike, so I’d recommend something lighter and sturdier like the F-Stop Tilopa, Its a little more expensive, but worth the investment IMO. I’ve been eyeing it for weeks, but I can’t justify buying it at the moment. 🙁 - 4L Nuun infused water in a platypus bladder ,$35
- Camping Knife
- Bear deterents
- Bear spray, Frontiersman $38
- Mini bluetooth speakers, JBL $56
You can also just talk to yourself, talk to your partner, bring a “bear bell” or play music on your phone. The theory is that making noise will scare off animals (bears in particular) before you see each other.
- Personal beacon, Garmin, $450
- Trekking Poles, Black Diamond, $17
Look for poles that are made of Carbon (the lightest material), are adjustable, and have Cork handles for a better grip that wicks away moisture (if you have sweaty palms). Cork handles are the lightest option, but if you need help finding the right poles for you – take a look at this article. - Headlamp, Cobiz, $25; (better version here: Black Diamond, $48)
One thing to note about this headlamp… I’ve been yelled at by neighboring campers for waking people up with it (because it’s so bright). I’ve also been made fun of for how unnecessarily bright it is (with its 3 lights), so it may be overkill for a backpacking headlamp and you may want this lighter and more practical one instead. Or you can give zero f’s and high beam the crap out of your trail and everyone in your way like I do. 😉 - Quick dry microfiber towel, Lululemon $18
There are similar, cheaper ones like this for half the price and a second, smaller version. It’s normally used to wipe off sweat, and anything when it gets wet or dirty, but I use it most to clean my camera gear as I go. - Facial sunscreen, Elta MD, $30
A legit excuse for any girl to wear a little makeup on a hike 😉 I love this facial sunscreen because it’s slightly tinted to even out your skin tone, and it protects your skin from sun damage at the same time. - Bug wipes, OFF!, $30 for 3 packs
What’s nice about Banff is that there aren’t as many bugs as there are in Virginia. Bugs weren’t that big of an issue on this hike, and I don’t remember seeing any at all, but I used these wipes just in case. I like carrying wipes, because they take up less space than spray bottles do, are a lot lighter to pack and you can control where you apply it. - Mini day-hike first aid kit, I Go $11
A first aid kit is standard for any hike, especially if you go alone. This mini kit is small, light and just enough to carry for emergencies on solo day hikes.
Snacks
- Clementines (or any hydrating fruits with Vitamin C your body can quickly absorb)
- Beef jerky, Vermont Smoked Meats, $40 for 18
I’m obsessed with this brand. The jerky isn’t chewy, nor does it have a weird soft texture – it snaps with each bite and doesn’t have a strong, lingering after taste that’ll piss off your hiking partner. It’s also individually packed and comes in several flavors like chipotle, barbecue, pepperoni, bacon (etc). - Coconut clusters, Innofoods, $14
I love these things and it kills me that they don’t have them in Virginia (or anything like it, I don’t think). The link above is for a different flavor, but my favorite is the one with cranberries and poppy seeds. If anyone knows where I can buy them let me know!
Camera equipment
- DSLR Camera Body, Canon 5DMIV, $3,100
- Telephoto 70-200 II f2.8 L lens, Canon, $1,800 (did not use, you’ll see why.. ⬇)
- Portrait 35mm f1.4 L lens, Canon, $1,700 (used this to take the above photo of me)
- Wide angle 10-24mm lens, Tamron (used this to take the photo of Hai Ling Peak below)
- Lightweight carbon fiber tripod, Benro, $140 (LOVE this smart, lightweight tripod)
- 3 fully charged lithium batteries
- Extra 64g SD card (although you shouldn’t need an extra 64gig card for a day hike, unless you take a ton of videos)
What I wore
My outfit is the only thing I wouldn’t change about my prep for this hike. Below is what I wore, and where to find each piece.
Clothing
- Compression, breathable & moisture-wicking long sleeve top, Carbon 38 (Old), Similar here: $79
- Medium support bra, Lululemon (old), Similar for $48
- Sturdy, but stretchy utility hiking pants with hooks, Fjallraven, $199
Accessories & Footwear
Hands
- Scrambling gloves, Black Diamond, $16
- GPS & Trail watch, Suunto, $600+ (varies)
Feet
- Thick hiking socks, Smartwool, $19
Thick hiking socks will help you avoid developing blisters. - Sturdy hiking/climbing boots that you can rely on to keep you from slipping, Salewa, $195 (Currently on sale from $300)
I like these because they kept me steady on slippery rocks I was afraid I’d fall off of. The only thing about these boots is that they are really, really stiff. I don’t know if it takes a few hikes to break them in, but, while they kept me balanced in places where I needed that the most – these boots aren’t very comfortable to wear. I still prefer my Oboz ($150) that are a lot more comfortable if you have wide set feet like me 🙂
What I’d do differently
If I had to do this hike again, I’d do a lot of things differently. Below is everything I’d do before getting on this mountain again.
Start earlier
I was overconfident when it came to my timing. I put my credit card down for a dinner reservation when I knew I’d be charged if I missed it. Needless to say, I was charged a no-show fee, and also didn’t eat dinner until 10:30PM that night. I underestimated the time it’d take me to get up and down the mountain (by 4 hours), and I thought that, because the sun goes down late in Banff, I’d never have to worry about losing daylight. As a result, I was almost stuck in the dark without a tent that night.
Bring a helmet
Especially if your backpack is heavy, or if you’re carrying anything that may cause you to lose your balance easily. There were a lot of areas where I was “exposed” and afraid of tipping too far backward, because the risk of falling was a lot greater if you have something swinging your body back and forth. The exposed section of this hike is incredibly steep, and will send you head first down a hill to the nearest boulder to break your fall if you aren’t careful. (Black Diamond Women’s Helmet, $56)
Bring a hiking partner
I talk a little more about it in Part II, but I didn’t listen when a local urged me to not hike alone the night before I did this hike. I regretted it when I found myself losing my mind running down the trail and trying to get off the mountain, terrified I’d get caught in the dark. If I had gotten injured and fell or knocked myself out – no one would’ve known, and doing a hike this steep makes this is an enormous risk I’d never take again.
Pack a real lunch
Again, I didn’t realize it’d take me all day to do this hike, so I ate a small breakfast, ate my snacks for lunch, and didn’t eat dinner until 10PM that night. As a result, my body shook all the way down the mountain on my descent. My legs were so weak that I struggled to just push the gas pedal when I drove home later that night. If I could do it again, I would’ve brought a sandwich or at least a protein bar.
Workout prior to hike
I was so stupidly overconfident about this hike, you guys -_- I thought I could roll up to the trail after watching netflix with all my free time leading up to this hike. I hadn’t worked out in weeks, and expected my body to do what I thought it could always do for me back in my pre-baby days. When I did this hike, my body felt like it’d been thrown onto an uphill treadmill after waking up from a 3 year slumber.. shocked and pissed, wondering wtf I just decided to do to it.
Bring a small (emergency) tent
Another great tip from my cousin (thanks Vivian!) if you’re doing a hike that you know is going to take you the whole day – bring a small tent just in case you get stuck, especially if you go alone. Though you aren’t technically supposed to camp out on Mount Rundle, I would’ve pitched a tent when the sun started going down so I could safely climb down when there was more light.
Learn more about exposure
When I asked a local what she thought of hiking Mount Rundle, she immediately warned me about the level of exposure. Thinking in photography terms, I thought she meant that I’d be exposed to a lot of sun because of the lack of shade, so I just applied more sunscreen; but I learned during this hike what she actually meant. “Exposure” in climbing or hiking terms relates to the “high risk of injury in the event of a fall because of the steepness of the terrain. If such routes are negotiated without any protection, a false step can result in a serious fall.” The “negotation of those routes can cause a fear of falling”, which is what I ran into when I climbed for a while, and all of a sudden decided to look back. What I saw froze me up when I realized how far I was from my last point of safety, and how steep the drop would be if I slipped. I was so afraid, that I remember digging my feet into the scree and taking a long moment to think about whether I wanted to continue, given that the climb would only become steeper. The first time I encountered a lot of exposure was also the very first time I ever thought about turning around on any hike.
Final thoughts
This is a non-technical climb!!! Not just any old hike. If you’re in decent physical condition and have climbed or bouldered before, OR if you just want to make it to the false summit (which is only a 4-5 mile hike) instead of doing the entire hike, you probably won’t have as much of a hard time as I did. That said, this hike wouldn’t have been so difficult if I had planned it better. The worst part of it (to me) was experiencing a lot of exposure for the very first time, treading up scree for the first time (which felt like quicksand, taking two steps to go one step forward), and just the mental toll it took on me when I lost the trail repeatedly as the sun started to go down. This trail is poorly marked, and the exposed section isn’t marked at all, so if you have a GPS watch or a phone – download the GPX map [via Alltrails] to follow it during this hike. When I wasted time and energy losing the trail and guessing my way back – that was when I really started to lose my mind… which leads to Part II.
Part II: The Pendulum’s Peak
Read an excerpt of Part II at the jump.
The wind blew my hair forward and into my face when I looked back and saw that the sun was beginning to set. I panicked when I realized I was losing daylight way too soon in my hike, and threw my camera gear into my backpack and started running to get off the mountain before the sun set completely. I made a mistake earlier in waiting for everyone to leave before me. I wanted the summit to myself and to have ample time to get the right photo, but was now the last person on the mountain. If anything happened to me at this point, no one would walk by to notice or hear me call for help.
As I started to descend, I could feel my legs shake. I thought that getting to the top would be the hardest part, but going down was the most painful part. Inch carefully down a steep trail, my panic grew as the trees started to cast darker shadows around my surroundings. The blisters on each of my heels stung with every step I took on a flat area; and my big toes ached as I descended and jammed them into the tips of new boots I hadn’t broken in yet. I felt so exhausted that finally I decided it’d be faster and less torture if I could just slide down the trail instead of painfully inching my way down. When I looked up and watched the sunlight disappear from the tree canopy, I quickly made my decision, sat down and lifted the pressure off my feet to let my body slide down what I thought was the trail. The steep descent sent me over 40 yards down a hill in less than a few minutes when a fallen tree brought me to a complete stop. My heart sank when I got up to look over the tree.
The fallen tree laid on the edge of a cliff. When I looked past the tree, I saw a steep, vertical drop that was impossible for me to safely climb down without being roped in. I stared at the drop for a moment in disbelief, because it meant that I’d lost the trail for the third time on my way down. It meant that I’d either have to carefully crawl all the way back up the hill to start over, or traverse across a rock formation I didn’t feel comfortable climbing by myself in the dark. At that point, I felt like I had been punched in the stomach. I folded my legs, dropped to my feet, put my head in my arms and wanted to scream. I probably would have if it weren’t for the irrational fear I had of bears and wolves following me down on this hike, waiting to have me when the sun went down. Instead of screaming, I reached for my phone. The edges of my fingernails burned as they scraped the zipper lining of my pant pockets, but I didn’t care. I had to facetime my kids. I knew they wouldn’t be able to cheer me on, or tell me how to get off the mountain. I just wanted to just see them smiling at me. I’ll never let my kids see anything less than an unbreakable mother as they grow, so I needed to feel them looking at me. It’s what I needed to put an end to my little pity party, and so I could get up and do what their mother does – finish everything she starts.
I dialed home three times and waited. Each time the call failed to connect, I hung up and immediately tried again; tapping the green call button and red hang up button over and over again, praying the call would connect just once as the sky got darker and darker. When I accepted that I wouldn’t be able to facetime my kids in order to get back on my feet – it settled in that I was completely out of service and alone in the dark. I sat there in defeat, trying not to cry, and thought of how terrible it would be if I laid behind the tree and slept there for the night. That was the moment I lost it.
[Read the full post later this week]


